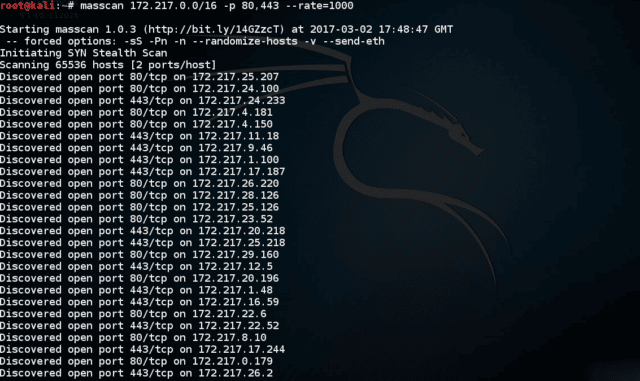
masscan is the fastest TCP port scanner, a really fast network scanner. It can scan the entire Internet in under 6 minutes, transmitting 10 million packets per second.
What is masscan – The Fast Network Scanner?
It produces results similar to nmap, the most famous port scanner. Internally, it operates more like scanrand, unicornscan, and ZMap, using asynchronous transmission. The major difference is that it’s faster than these other scanners. In addition, it’s more flexible, allowing arbitrary address ranges and port ranges.
NOTE: masscan uses a custom TCP/IP stack. Anything other than simple port scans will cause conflict with the local TCP/IP stack. This means you need to either use the -S option to use a separate IP address, or configure your operating system to firewall the ports that it uses.
masscan & PF_RING – Beyond 2 million packets/second
To get beyond 2 million packets/second, you need an Intel 10-gbps Ethernet adapter and a special driver known as “PF_RING DNA” from http://www.ntop.org/products/packet-capture/pf_ring/. Masscan doesn’t need to be rebuilt in order to use PF_RING. To use PF_RING, you need to build the following components:
- libpfring.so (installed in /usr/lib/libpfring.so)
- pf_ring.ko (their kernel driver)
- ixgbe.ko (their version of the Intel 10-gbps Ethernet driver)
You don’t need to build their version of libpcap.so.
When masscan detects that an adapter is named something like dna0 instead of something like eth0, it’ll automatically switch to PF_RING mode.
How to use masscan for TCP scanning
Usage is similar to nmap. To scan a network segment for some ports:
|
1 |
# masscan -p80,8000-8100 10.0.0.0/8 |
This will:
- scan the 10.x.x.x subnet, all 16 million addresses
- scans port 80 and the range 8000 to 8100, or 102 addresses total
- print output to
that can be redirected to a file
To see the complete list of options, use the –echo feature. This dumps the current configuration and exits. This output can be used as input back into the program:
|
1 2 |
# masscan -p80,8000-8100 10.0.0.0/8 --echo > xxx.conf # masscan -c xxx.conf --rate 1000 |
masscan Banner Checking
masscan can do more than just detect whether ports are open. It can also complete the TCP connection and interaction with the application at that port in order to grab simple “banner” information.
The problem with this is that it contains its own TCP/IP stack separate from the system you run it on. When the local system receives a SYN-ACK from the probed target, it responds with an RST packet that kills the connection before it can grab the banner.
The easiest way to prevent this is to assign the tool a separate IP address. This would look like the following:
|
1 |
# masscan 10.0.0.0/8 -p80 --banners --source-ip 192.168.1.200 |
The address you choose has to be on the local subnet and not otherwise be used by another system.
In some cases, such as WiFi, this isn’t possible. In those cases, you can firewall the port that it uses. This prevents the local TCP/IP stack from seeing the packet, but it can still see it since it bypasses the local stack. For Linux, this would look like:
|
1 2 |
# iptables -A INPUT -p tcp --dport 60000 -j DROP # masscan 10.0.0.0/8 -p80 --banners --source-port 60000 |
On Mac OS X and BSD, it might look like this:
|
1 2 |
# sudo ipfw add 1 deny tcp from any to any 60000 in # masscan 10.0.0.0/8 -p80 --banners --source-port 60000 |
Windows doesn’t respond with RST packets, so neither of these techniques are necessary. However, it is is still designed to work best using its own IP address, so you should run that way when possible, even when it’s not strictly necessary.
The same thing is needed for other checks, such as the –heartbleed check, which is just a form of banner checking.
Download masscan
You can download masscan here:
Or read more here.